27.11.11

Bootmgr is Missing in Windows 7

This is one of the most common boot issue you might come around, in the Windows operating system. In this article I will tell you how you can fix the Bootmgr is Missing error message in Windows 7

Step 1:

Insert the Windows 7 Installation or Repair disk into your drive and reboot the System. You will be prompted to “Press any key to boot from disk” so go ahead and press Enter.


Step 2:

Then it will give you language selection option click Next.


Step 3:

You will now get the option to “Repair your Computer“.
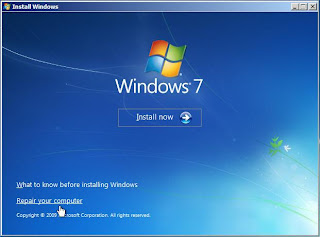


Step 4:

Select Repair your computer option and the Operating System i.e. Windows 7 next. Click Next.


On some occasions you may not find any operating system listed. Don’t panic just click Next!
Step 5:

Now click on “Command Prompt“.


Step 6:


Type in the following commands:

bootrec /fixboot
bootrec /fixmbr
bootrec /RebuildBCD

Sometime you may need to change the directory from X:\Windows\System to C:\ type in the command cd\ then c: then run the commands.

Once you finish running those commands, reboot the system and see if it boots. It should! If not then run Startup Repair 3 different times.

How to Change Windows 7 Theme : Windows Theme Installer

Windows can be easily customized with different wallpapers, window skins and other eyecandy contained in visual themes. Unfortunately these themes often come from third-party developers and won't work on Windows unless you do some system tweaking before – something that's off-putting for many users. And here's where Windows Theme Installer can lend you a hand.
Windows Theme Installer

How to use Windows Themes Installer:

INSTALL A THEME AND CHANGE SYSTEM FILES:
1. Run the tool as Administrator.
2. Select the options which you want to install:
i) Theme
ii) Explorer.exe
iii) OobeFldr.dll
iv) ExplorerFrame.dll
v) Shell32.dll
3. Once you have selected the options, click on the “Browse” button and browse for the file of the desired option.
4. Now click on “Install Theme” button to install the theme and replace the system files.

RESTORE DEFAULT SYSTEM FILES:
To restore the default system files click on the “Restore Default System Files” button.

REMOVE A THEME:
To remove a theme select the theme which you want to remove from the list and click on the “Remove Theme” button.

APPLY A THEME:
To apply a theme select the theme which you want to apply from the list and click on the “Apply Theme” button.

It is always a good idea to create a system restore point first before making any changes to your system. Should the need arise, the System File Checker Utility will help you replace your system files with ‘good original’ Windows system files.

Download

23.8.11

ESET Microsoft security update (KB2286198) hangs or causes a BSOD on restart

If you are experiencing a system hang or blue screen error after attempting to install Microsoft security update (KB2286198), you will need to update your ESET security product. This issue is due to a potential conflict with the Windows update and ESET NOD32 Antivirus and ESET Smart Security. Downloading a new ESET virus signature update (version 5338 and later) will resolve this issue. To update your ESET security product, follow the steps below:

Open the main program window by clicking the ESET icon next to the system clock or by clicking Start All Programs ESET ESET Smart Security or ESET NOD32 Antivirus.

Click Update from the main menu on the left and click Update virus signature database in the main program window on the right.

The Update status should read: Version of virus signature database: 5338 (20100803). Verify that you have version 5338 or later.

Restart the Windows update process. Visit Microsoft's Windows 7 Solution Center for more information on receiving Windows updates.

Update for Windows (KB2570791)

Locale: All
Deployment: Windows Update, Microsoft Update, Important/Automatic Updates, WSUS, and Catalog
Classification: High Priority, Non-Security, Update Rollups
Supersedes: KB2443685 on Windows Embedded Standard 7, Windows 7, Windows Server 2008 R2, Windows Server 2008, Windows Vista, Windows Server 2003, and Windows XP
Target platforms: Windows Embedded Standard 7, Windows 7, Windows Server 2008 R2, Windows Server 2008, Windows Vista, Windows Server 2003, and Windows XP
Approximate file sizes:

Windows Embedded Standard 7/Windows 7 update: ~ 712KB
Windows Embedded Standard 7 x64/Windows 7 x64/Windows Server 2008 R2 x64 update: ~ 1152KB
Windows Server 2008 R2 IA-64 update: ~ 217KB
Windows Server 2008/Windows Vista update: ~ 457KB
Windows Server 2008 IA-64 update: ~ 148KB
Windows Server 2008 x64/Windows Vista x64 update: ~ 529KB
Windows Server 2003 update: ~ 499KB
Windows Server 2003 IA-64 update: ~ 1033KB
Windows Server 2003 x64/Windows XP x64 update: ~ 691KB
Windows XP update: ~ 502KB

Description:
Install this update to resolve issues caused by revised daylight saving time and time zone laws in several countries. This update enables your computer to automatically adjust the computer clock on the correct date in 2011. After you install this item, you may have to restart your computer.

Twitter Delicious Facebook Digg Stumbleupon Favorites More