Showing posts with label Devices. Show all posts

6.8.11

Windows 7 fails to configure updates

As a first step of troubleshooting, I would suggest you to check the updates history to see if there are any updates that have a failed status and let me know the description of those updates.

Step 1: Check the update history

http://windows.microsoft.com/en-US/windows7/See-which-Windows-updates-are-installed

Let me know if the description of the updates that have failed status.


Step 2: Manually try installing the updates from Microsoft Download Center

a. Go to the Microsoft download website, type the "KB" number of the update into the download search box, and then click Go.

b. In the list of search results, click the Knowledge Base (KB) article link to go to the download page. If there's more than one listing, look for a link that goes to the Microsoft Download Center.

Windows 7 fails to configure updatesc. If there are multiple versions on the download page, find the appropriate one for your computer. Click the Download button, and save the update to your desktop.

d. When prompted, click Open to install the update.


Step 3: Run Windows Update Troubleshooter

http://windows.microsoft.com/en-US/windows7/Open-the-Windows-Update-troubleshooter


Step 4: The update is not installed successfully, you receive a message, and the computer restarts when you try to install an update in Windows Vista and Windows 7

http://support.microsoft.com/kb/949358

Can't install KB2160841 Error Code: 66a

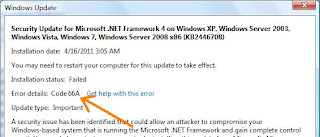
Getting error code 66A Windows update encountered an unknown error. Security Update for .NET Framework 4 on Windows XP, Windows Server 2003, Windows Vista, Windows 7, Windows Server 2008, Windows Server 2008 R2 for x64-based Systems (KB2160841)

Can't install KB2160841 Error Code: 66a
Installation date: ‎10/‎17/‎2010 2:14 PM

Installation status: Failed

Error details: Code 66A

Update type: Important

A security issue has been identified that could allow an attacker to compromise your Windows-based system that is running the Microsoft .NET Framework and gain complete control over it. You can help protect your computer by installing this update from Microsoft. After you install this item, you may have to restart your computer.

11.7.11

Fix error audio service is not running

Recently when I rebooted my computer, the audio stopped running. Usually, troubleshooter will automatically fix the problem, but surprisingly in this occasion, even the troubleshooter failed to start. The speaker icon in the notification area had a red cross over it.
Here’s a work around:
Fix error audio service is not running

1. Click on Start, and type Services.msc in the search bar.

2. Scroll through the list of services, right click on Windows Audio and click Start.

If this doesn’t work, make sure, you have started all other dependent services such as Plug and Play, Multimedia Class Scheduler, Windows Audio Endpoint Builder

9.7.11

Disable Debugging script and runtime errors in Internet Explorer

I thought I’d take a couple minutes to talk about Script Debugging and Internet Explorer.

Script debugging is turned off by default you can enable it by going to:
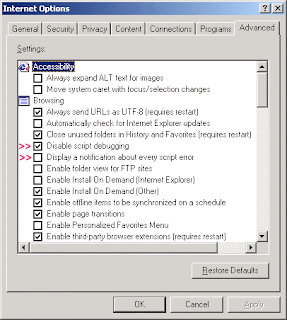
Tools->Internet Options…->Advanced->Disable Script Debugging

Prior to XPSP2 the above will turn script debugging on for all applications that host the WebBrowser control (Outlook for example).

On XPSP2 we’ve split the option into two:
Tools->Internet Options…->Advanced->Disable Script Debugging (Internet Explorer)
Tools->Internet Options…->Advanced->Disable Script Debugging (Other)

When you’ve enabled Script Debugging ‘View->Script Debugger’ will now be present to help you break into the debugger.

The debugger statement can also be placed anywhere in your code to suspend execution this is similar to setting a breakpoint.
The Stop statement is the VBScript version of JScript’s debugger statement.

There are three applications which I’ve used for script debugging. One is Visual Studio.Net, the second is Microsoft Script Debugger and the third is Microsoft Script Editor:

Miscrosoft Script Debugger:
You can obtain a copy of the Microsoft Script Debugger here:
http://www.microsoft.com/downloads/details.aspx?FamilyID=2f465be0-94fd-4569-b3c4-dffdf19ccd99&displaylang=en

The main MSDN page for using the Microsoft Script Debugger can be found here:
http://msdn.microsoft.com/library/default.asp?url=/library/en-us/sdbug/Html/sdbug_1.asp

The Microsoft Script debugger allows you to debug client side and server side scripts and provides the same functionality as most debuggers do.

Directions on using the Microsoft Script debugger can be found here:
http://msdn.microsoft.com/library/default.asp?url=/library/en-us/sdbug/Html/sdbug_2.asp

Microsoft Script Editor:
The Microsoft Script Editor comes free with Microsoft Office XP/2003 with FrontPage.
http://msdn.microsoft.com/library/default.asp?url=/library/en-us/dnfp2k2/html/odc_fpdebugscripts.asp

Visual Studio.net:
For Visual Studio.net debugging Monica Rosculet has written an excellent article on: Debugging Script Code Using Visual Studio.

Other:
Gregg Miskelly a developer on the Visual Studio team has posted some excellent information about: How Script Debugging Works.
Disable Debugging script and runtime errors in Internet Explorer

Are you getting annoying messages such as "A Runtime Error has occurred. Do you wish to Debug?" or "Internet Explorer Script Error. An error has occurred in the script on line 1. Do you wish to continue running scripts on this page?"

There are three reasons why these problems occur. The first is that the web page author made some programming error. The second reason may be that you are running a pop-up killer that closes pop-up windows so fast that the script on the web page fails. The third is that you might have some adware or spyware installed on your computer that opens the script error pop-ups.

How to disable script and runtime errors
You can configure Internet Explorer to ignore these script and runtime errors. Please follow this step-by-step guide:

1. Open Internet Explorer.

2. Click on Tools, then on Internet Options.

3. Click on the Advanced tab.

4. Look for the "Disable script debugging" line and put a check mark in the box.

5. Now look for the "Display a notification about every script error" line and remove the check mark in the box.

8.7.11

0xC0000034 error message when you try to install Windows 7 SP1

This article describes a hotfix that prevents the following issue. For more information about how to recover from this issue after it has already occurred, click the following article number to view the article in the Microsoft Knowledge Base:
975484 Your computer may freeze or restart to a black screen that has a "0xc0000034" error message after you install Service Pack 1 on Windows 7 or Windows 2008 R2
Consider the following scenario:

You install Windows 7 Service Pack 1 (SP1) or Windows 2008 R2 Service Pack 1 (SP1) on a computer.
You install some other updates before you restart the computer to complete the installation process. Or, the service pack is installed at the same time as other updates by using Windows Server Update Services (WSUS).

In this scenario, the computer may stop responding or restart. If the computer restarts, you receive an error message that resembles the following on a black screen:
0xC0000034 error message when you try to install Windows 7 SP1

0xC0000034

Note If the computer stops responding and you restart the computer, you receive the same error message.

All supported x86-based versions of Windows 7
Download

All supported x64-based versions of Windows 7
Download

All supported x64-based versions of Windows Server 2008 R2
Download

All supported IA-64-based versions of Windows Server 2008 R2
Download

For more information about how to download Microsoft support files, click the following article number to view the article in the Microsoft Knowledge Base:
119591 How to obtain Microsoft support files from online services
Microsoft scanned this file for viruses. Microsoft used the most current virus-detection software that was available on the date that the file was posted. The file is stored on security-enhanced servers that help prevent any unauthorized changes to the file.

Notes

You must install this update package on a computer that is running Windows 7 or Windows Server 2008 R2 operating system. You cannot install this update on an offline image.
In a Windows Server Update Services (WSUS) environment, this update is marked as "Exclusive." You will only be offered this update if you have installed all other updates that are marked as "Important."

Prerequisites
To apply this update, you must be running one of the following operating systems:

Windows 7
Windows 7 Service Pack 1 (SP1)
Windows Server 2008 R2
Windows Server 2008 R2 Service Pack 1 (SP1)

Registry information
To use the update in this package, you do not have to make any changes to the registry.
Restart requirement
You do not have to restart the computer after you apply this update.
Update replacement information
This update does not replace a previously released update.
Update removal information
You cannot remove this update.
File information
The global version of this hotfix installs files that have the attributes that are listed in the following tables. The dates and the times for these files are listed in Coordinated Universal Time (UTC). The dates and the times for these files on your local computer are displayed in your local time together with your current daylight saving time (DST) bias. Additionally, the dates and the times may change when you perform certain operations on the files.

Windows error message Microsoft Internet Explorer has encountered a problem and needs to close (Pdm.dll)

windows explorer has encountered a problem and needs to close. we are sorry for the inconvenience
Windows error message Microsoft Internet Explorer has encountered a problem and needs to close (Pdm.dll)


Important This article discusses a very specific Internet Explorer crash in older versions of the script debugger (Pdm.dll) that was included with Office 2000 and Visual Studio 6 (pre-SP3 version). If you view the error report details listed in the "Symptoms" section, and Pdm.dll version 6.0.0.8169 is not listed under Module Name, then this article does not apply to you.

If you are experiencing other Internet Explorer issues, such as Internet Explorer hanging, not working, or restarting, please visit the following Microsoft Web site:
http://support.microsoft.com/gp/pc_ie_intro

I had the exact same problem a while ago with the "My Videos" folder. Here's the solution:
1. Click on Start>>Run.
2. Paste the following command:

regsvr32 /u shmedia.dll

Click OK.

Now try revisiting the folder. It should work. To undo the above command, Click on Start>>Run and type:

regsvr32 shmedia.dll

That's all there is to it.

Enjoy!

11.6.11

Windows 7 gen_ml.dll error with KMPlayer

gen_ml.dll (media library winamp plugin) problem is a common issue in Windows Vista/Windows 7. Playback seemed to work for me, but startup was extremely slow and the screen froze for ten seconds. To avoid it you can do one of the following:

Delete gen_ml.dll from plugins folder if you don’t need it (Recommended) (I tried renaming the file, but it still caused problems)
Install KMP in a folder with admin rights.
Run KMP with admin rights (right click on file -> properties)
Disable UAC in Windows Vista (not recommended)

Via: Access Violation on startup (gen_ml.dll)

Common DLL Errors and Fixes in Windows Vista

DLL or Dynamic Link Library files are used by Windows operating systems and applications installed on them to store functions and codes that can be called on whenever required. There are hundreds of DLL files on a Windows system and several conditions that may result in DLL errors. Some of the common causes of DLL errors are:

Missing, corrupt, or damaged DLL.
Overwriting or deletion of one or more DLLs during program install or uninstall.
Faulty or corrupt applications.
Malware infections.
Erroneous or invalid entries in the registry.

To understand DLL errors better, let’s have a look at some common DLL errors and the methods you can use to fix them. Here are some most common:

Msvcr71.dll Error
Msvcp71.dll Error
Shell32.dll Error
Msoe.dll Error
Simple Tips to Prevent and Fix DLL Errors

8.5.11

What is User Account Control?

Every single time you delete a file, Windows asks you “Are you sure you want to move this file to the Recycle Bin?” This is typically a good thing, to prevent you from deleting files by accident, but if you are trying to do some cleanup and need to delete a lot of files, you might not want to be prompted every single time.

There’s a simple way to turn it off.

Right-click on your Recycle Bin
Choose Properties from the menu.

Now you’ll see the Trash Properties dialog, and notice the “Display delete confirmation dialog” at the bottom.

Uncheck the box.
Press Apply, and hit OK

Thats it, although it is recommended to have it turned on.

Error while saving pictures in Windows 7

If you have Windows 7 Operating System, and you received an error during a process of saving a picture or any other file from the web, we have the solution for you! You are getting this error because the user that is registered on your computer does not have permission to modify files, such as renaming pictures while you are saving them.. Follow these steps to fix this issue.

1. Find the user’s folder in Computer > Local Disk > Users
2. Right-click the ownership’s folder, and then select Properties.
3. Click on Security tab, and click on a desired user.
4. Click the Advanced button.
5. Check mark Full Control.
6. Click Apply, then press OK.

Adding a device

When you add a Bluetooth device to your computer, address information is exchanged. Sometimes, access keys are also exchanged. This process is known as pairing or bonding the two devices. When you add a device, one of the devices must be discoverable. Some devices let you turn discovery on and off, and others are always discoverable. For example, some mouse devices are always discoverable.

When you use Bluetooth to connect two computers, the computer that is added as a device must have discovery turned on. You can turn on discovery by using the Options tab in Bluetooth Devices.

Steps to take on the computer
To add a device, follow these steps on your computer:

Click Start, click Run, type bthprops.cpl, and then click OK.
In Bluetooth Settings, click Add.
In the Add Bluetooth Device Wizard, click to select the My device is set up and ready to be found check box, and then click Next.

Note You cannot click Next until you click to select the My device is set up and ready to be found box. A device that has discovery turned off cannot be detected during a search.

When you click Next, your computer searches for any discoverable devices that are in range. When the search is complete, the devices appear in the wizard.
Select a device to add, and then click Next.

After you select the device to add, you can enter a passkey for the device. A passkey is a code that is used to control access to a device. Using a passkey may help improve the security of your connection. However, the device that you add may not require a passkey.

When you enter the passkey, your computer tries to connect to the device to verify the passkey. When you connect to another computer, you receive a message that the computers are trying to connect.

Steps to take on the device
When you have completed the steps on your computer, enter the passkey on the Bluetooth device. If the device is another computer, this computer displays a message that indicates that you are requesting a connection. Follow these steps on the computer that you are adding as a Bluetooth device:

Click in the message that indicates that you are requesting a connection.

The Add Bluetooth Device Wizard starts and provides a field for entering the passkey.
Enter the passkey. You may also choose to have a passkey generated for you.

When the passkey is verified, the connection is complete. The device is now visible on your computer. If the device is another computer, its computer name is visible on the first computer.

On the last page of the Add Bluetooth Device Wizard, you can turn discovery off on the computer that you add as a device. By default, the option to turn discovery off is selected so that the computer does not remain discoverable at all times.

After a device is added
After a device is added, it appears in Bluetooth Devices. You can view the device properties to examine the services provided, to change the name of the device, or to gather other information. You can also establish connections.

Connectivity problems in Windows XP Service Pack 2

Basic troubleshooting
This section of the article contains basic troubleshooting methods to resolve Bluetooth issues that may occur after you install Windows XP Service Pack 2.

The troubleshooting steps in this section are appropriate for beginning to intermediate users. If the troubleshooting steps in this section do not resolve your issue, you may want to try the steps in the "Advanced troubleshooting" section later in this article.

This section of the article discusses the following topics:

Steps to try first
Steps to try if your Bluetooth device is not detected when you add the device

Steps to try first
Try the following basic troubleshooting steps first. They may quickly resolve your issue.

If your Bluetooth device uses batteries, make sure that your batteries are charged.
If your Bluetooth device uses a transceiver that connects to your computer through a USB port, try connecting the transceiver to another USB port on your computer.
If there are multiple Bluetooth devices connected to your computer, temporarily remove the devices that you are not troubleshooting. If there are additional USB devices, try removing any USB devices that you do not have to have installed during the troubleshooting process. If you have multiple devices that are connected by using USB, this can interfere with a Bluetooth transceiver.
Verify that the Bluetooth device that you are troubleshooting is powered on and that it is enabled.

Steps to try if your Bluetooth device is not detected when you add the device
Method 1: Make sure that Windows XP Service Pack 2 is installed
Verify that you have Windows XP SP2 installed. To do this, follow these steps:

Click Start, and then click Run.
In the Open box, type winver.exe, and then click OK.
In the About Windows dialog box, verify that Windows XP SP2 is installed.

About Windows dialog box

If Windows XP Service Pack 2 is listed, try Method 2. If If Windows XP Service Pack 2 is not listed, install the service pack again. To install Windows XP Service Pack 2, follow these steps:
In Internet Explorer, visit the following Microsoft Web site:
http://update.microsoft.com/
If any important updates are available for your computer, install them. To do this, click Install updates. If you are prompted to restart your computer after all the updates are installed, restart your computer.

Important You might have to restart your computer after you install certain updates. When you restart your computer, the content that you are now viewing will no longer be displayed. So, before you continue, you might find it helpful to create a shortcut to this Web page on your desktop so that you can easily return to this page by double-clicking the shortcut. To create a shortcut to this Web page on your desktop, follow these steps:

Right-click this page, and then click Create Shortcut.
In the Internet Explorer dialog box, click Yes to create a shortcut on your desktop.

Method 2: Make sure that your Bluetooth device is discoverable and that your computer is set to enable Bluetooth devices to connect to your computer

Right-click the Bluetooth icon in the notification area, and then click Open Bluetooth Settings.

Bluetooth icon

Note If the Bluetooth icon is not in the notification area, click Start, click Run, type bthprops.cpl, and then click OK. To use the bthprops.cpl command, make sure that Windows XP SP2 supports your Bluetooth adapter and the Bluetooth adapter has been successfully installed on your Windows XP SP2-based computer. For more information about how to install the Bluetooth adapter and Bluetooth devices in Windows XP Service Pack 2, click the following article number to view the article in the Microsoft Knowledge Base:
883259 How to install and configure Bluetooth devices in Windows XP Service Pack 2
On the Options tab, click to select the Turn discovery on check box, and then click Apply.

Bluetooth Devices dialog box

To enable Bluetooth devices to connect to your computer, click to select the Allow Bluetooth devices to connect to this computer check box, and then click OK.

Bluetooth Devices dialog box

Advanced troubleshooting steps
This section is intended for advanced computer users. If you are not comfortable with advanced troubleshooting, you might want to ask someone for help or contact support. For information about how to do this, visit the following Microsoft Web site:
http://support.microsoft.com/contactus/

5.5.11

Phone to Windows 7 Bluetooth File Transfer

Bluetooth devices are very common nowadays. By using this technology it is so easy to share files between very different devices. If your computer or laptop has a Bluetooth dongle or built-in module, Windows 7 can use it for exchanging files with other Bluetooth enabled devices such as mobile phones, iPods, iPhones, PSP devices, etc. In this guide I will show you how to verify that your dongle or built-in module works, how to connect your computer to another Bluetooth enabled device and how to exchange files between them.
Verify that Bluetooth is Working Correctly
The first thing you should do before starting a Bluetooth connection is to make sure that the Bluetooth dongle or integrated module is inserted in the computer and turned on.
Windows 7 will then install the drivers needed for the Bluetooth device. It has drivers for most Bluetooth dongles and built-in devices but, if it's not able to find any suitable drivers for it, then you should install those which are bundled by the manufacturer of your product via an install disc or on its official website.
Next, you will see a Bluetooth icon in the system tray or notification area which means that Bluetooth is active.
Bluetooth
If it is not active, you'll have to enable Bluetooth on your computer. By default, the wireless and Bluetooth connections are active. If, for some reason, they're not, look for a button on the surface of your laptop that should enable both wireless and Bluetooth connections. If you can't find that button please read the laptop's manual to find it and learn how to turn on Bluetooth.
Now, you need to make sure that the Bluetooth works properly. Type in the Start menu search box the word bluetooth and click on the 'View devices and printers' search result. Another way is to go to 'Control Panel -> Hardware and Sound -> Devices and Printers'.
Bluetooth
In the new window you will see a list with all devices and printers that are connected to your computer. The Bluetooth dongle or integrated module will be on that list as well. If your Bluetooth device has a yellow exclamation point on its icon it means that there is a problem with it. Otherwise it means that the device is working properly.
Bluetooth
If the device has problems, select it and then click on the Troubleshoot button from the top menu. Follow the wizard's instructions and hopefully, Windows will find a solution to the problem.
Bluetooth
NOTE: If the device that you want to connect via Bluetooth to your computer has specific software applications made exactly for this kind of task, I recommend you to use that software. For example, if you have a phone with Bluetooth support it is a good idea to use that phone's "PC Suite" application on your computer.
Connect a Device to Your Computer Using Bluetooth
First you need to make sure that your computer can be seen by the Bluetooth device. In other words, you need to make sure the computer is discoverable via Bluetooth. You can access the Bluetooth settings on your computer by right-clicking the Bluetooth icon in the system tray or notification area, and selecting 'Open Settings'.
Bluetooth
Or you can simply search in the Start Menu's search box for bluetooth and click on the 'Change Bluetooth settings' search result.
Bluetooth
The Bluetooth settings window will now open. In the Options tab, at the Discovery section, check 'Allow Bluetooth devices to find this computer'. This will allow other devices to see your computer. When done, click on OK.
NOTE: Enable this option only if you want the Bluetooth device to find and connect to your computer. The other way around, connecting from the computer to the device, works without having this option enabled.
Bluetooth
Next, you have to activate Bluetooth on your device. Search for discoverable devices, select the computer and pair with it. Then you have to enter a password for this connection. On your computer you will see a system notification about a device that wants to connect with it. Click on that balloon or, if you missed it, double click on the Bluetooth icon from the system tray or notification area.
Bluetooth
In the new 'Add a device' window you have to type the same password as you did in in the device that is connecting to the computer. Then click on Next.
Bluetooth
Now Windows 7 will search for drivers and it will install them for the device that is connecting to your computer. To verify that the device has been properly installed click the Devices and Printers link from the 'Add a device' window.
Bluetooth
There you can also see if the device is working properly or if it requires troubleshooting.
NOTE: If Windows doesn't find suitable drivers for the Bluetooth Peripheral Device, don't worry, you will still be able to send and receive files.
Bluetooth
Now, assuming that there are no problems, let's see how to send a file from the device to the computer through Bluetooth.
Connect the Computer to a Device Using Bluetooth
Turn on the Bluetooth function on the device and make it discoverable so that your computer will find it. Then open up the Bluetooth device window either by double-clicking the Bluetooth icon from the system tray or notification area. Click on the 'Add device' button or simply search in the Start Menu's search box for bluetooth and select the 'Add a Bluetooth device' result.
Bluetooth
Next Windows 7 will search for Bluetooth enabled devices. When it finds your Bluetooth device, select it and click on Next.
Bluetooth
Then Windows 7 will show you a password or PIN that you have to type in the device. After you typed the PIN in your device, click on Next.
Bluetooth
Now you can see the newly added device in the Bluetooth Devices window. There you can also see if the device is working properly or if it requires troubleshooting.
How to Send a File via Bluetooth
In order to send a file either right-click the Bluetooth icon from the system tray/notification area and select the 'Send a file' option or search for bluetooth in the Start Menu's search box and click on 'Bluetooth File Transfer'. Then select the 'Send a file' action.
Bluetooth
Now select the device to which you want to send a file from the computer and click on Next. In the next window, click on Browse to select the file that you want to send and then click on Next.
Bluetooth
Tip: Hold down the Shift or Ctrl key to select multiple files.
You might need to allow the transfer on your device as well, and only then the computer will connect with it and it will send the file. In the next window you will see a summary of the files that were delivered to the device through the Bluetooth connection. Click on Finish to exit the window.
Bluetooth
If you want to send other files, repeat the same steps as above.
How to Receive a File via Bluetooth
In order to receive a file from the device to your computer, you can either right-click the Bluetooth icon from the system tray or notification area and select 'Receive a file' or search for bluetooth in the Start Menu's search box and click on 'Bluetooth File Transfer'. Then select the 'Receive a File' option.
Bluetooth
Windows 7 will wait until you select a file on your device. Select the file to be sent to the computer through the Bluetooth connection, wait until the device finds the computer, select it, and then your computer will receive the file. In the next window you will see the name and the size of the file and you have to possibility to choose where to save it. Click on Browse to choose a different location than the default one and then click on Finish.
Bluetooth
The file is now received and stored in the location you selected.
Conclusion
As you can see, sending or receiving files through a Bluetooth connection is quite easy, even if some problems can happen. The lucky part is that the troubleshooting wizards are definitely better at offering solutions then those from Windows Vista and, when using them, you will get some good solutions to your problems.
The wide range of devices that have support for Bluetooth can be a disadvantage because Microsoft can't collect and deliver driver support for every product that has Bluetooth capabilities. That's why every topic about Bluetooth connections between devices and computers is full of people complaining about problems with the connection, drivers or anything in between.
The best way to eliminate some of the problems is to switch from your old phone to a newer one with more modern capabilities and driver support.
If you have problems, solutions or you know some great tips and tricks about Bluetooth connections don't hesitate to share them with us in a comment.
File Is Missing Or Corrupt

A student brought a laptop into the desk that would display “Windows XP could not start because the following file is missing or corrupt: \WINDOWS\SYSTEM32\CONFIG\SYSTEM”.

The affected system was a Dell Latitude D620 running Windows XP Professional SP2.
There are several variations of this problem. Errors in \System and \Software are the two most common. After research through the Microsoft KB article located at http://support.microsoft.com/kb/307545 i was able to water it down a bit for this scenario. Note that i recommend reading through and following the steps in order, but for the \SYSTEM error, I only needed a few of the commands.

First off, you need to grab your Windows CD, and boot into the recovery console. This is done by booting to your CD-ROM (F12 on a Dell System), letting the Windows installer load, and then selecting R for Recovery console at the first menu that give you an option to do anything. After pressing R, log onto your windows installation by pressing the appropriate number (usually 1) and enter your Administrator password if prompted. If you don’t remember your administrator password, you will need to reset it using a Linux disk. That is a topic for a separate post.

Once successfully in the recovery console, run the following commands, in order.

md tmp
copy c:\windows\system32\config\system c:\windows\tmp\system.bak
delete c:\windows\system32\config\system
copy c:\windows\repair\system c:\windows\system32\config\system
exit

Once your computer reboots, you should be presented with the Windows XP loading screen, and eventually your desktop.

Identifying An Unknown PCI Card

Microsoft Windows 95, 98, and ME users can look at their registry to determine the manufacturer or model of a PCI device installed in their computer. To do this follow the below steps, if you do not with to edit the registry and want to use a different program skip to the next section.
Open the registry by clicking start, run, and typing regedit.
In the Registry Editor go into the below registry keys

Windows 95, 98, and ME users
HKEY_LOCAL_MACHINE\
Enum\
PCI\

Windows 2000 users
HKEY_LOCAL_MACHINE\
SYSTEM\
ControlSet0001\
Enum\
Within the above key you should be other folders similar to the below example.

VEN_5333&DEV_8901&SUBSYS_00000000&REV_16
As can be seen in the above example you have a lot of useful information that can be used to identify the card. In this example the VEN aka Vendor is 5333. Doing a search for this Vendor on the PCI database shows that this particular PCI device is a "S3 Graphics Co. product." You can find a link to the PCI database.

PCI Database Find Those Missing Drivers

It is a typical scenario. You are prepping a system for imaging, or reformatted a system, you don’t have the drivers disk and you have that one pesky piece of hardware that you just cant seem to find a driver for.

A missing Decive in Windows

A missing Device in Windows

There are plenty of sites to find drivers, the best being your systems manufactures website, secondly the website for the manufacturer of the component missing; but how do you know what driver you need? You need to identify what exactly that “Unknown Device” is before you can start poking around to find the driver for it. There are many applications on the internet that you can download that will supposedly tell you what driver you need, and go download it, but they typically come packaged with unwanted software or in some cases malware.
Using what your system already knows about the hardware, and a few online resources, you can easily find what the “Unknown Device” is referring to without cluttering up your system with unwanted software. All PCI devices are assigned a Vendor ID, and a Hardware ID. The vendor ID identifies what company manufactured that device. The Hardware ID uniquely identifies the model of that vendors device. Using these two key pieces of data, we can quickly identify what driver is needed.
-
- First, access the device manager, and view the properties of the unknown device.

- Next, click on the details tab of the missing device

- Select Hardware IDs from the drop down. We will use the screen shot below to analyze what exactly we are looking at.
Hardware and Vendor ID's

Hardware and Vendor ID's


In this string of data, we are only concerned with to key pieces of information. The data contained in Red is the Vendor ID. This always starts with VEN_. The data contained in green is the Device ID which always starts with DEV_. Now that we know how to find these peices of information, lets put them to use.
- Open a web browser and visit http://www.pcidatabase.com/. This is an online resource containing every PCI device that is manufactured.

- Enter your device ID, without the DEV_ into the Device Search field and press search. Note that we could search the Vendor ID, but that would only tell us who manufactured the device. We need the model so that we can find the appropriate driver for it.
- The device model will be displayed.
Vendor Search Result

Vendor Search Result
From here we can see that the “Unknown Device” in my case was the SoundMax Integrated Digital Audio driver. You can see it also gives us the vendor ID which matches the data found in red in the above screen shot. Armed with the knowledge of your missing device, you can visit your system manufactures driver download area and find the appropriate driver for your OS.

Unknown Devices And Find Correct Drivers

GoldSolution Software announces the release of Driver Magician 3.18, a unique utility for the Windows operating system that detects unknown devices, backs up, restores and updates device drivers with ease.

A device driver is a specific type of computer software, it acts like a translator between device and programs that use the device. All devices in computers will be useless without correct drivers. We often meet the situation where we lost device drivers diskettes or we don't know what devices are in computers. It will take a lot of time to find correct drivers on the Internet.

Driver Magician can help you detect unknown devices in computers and give downloading link of correct device drivers. Database of unknown devices in Driver Magician contains more than 20,000 devices, and it will continually add more devices. After unknown devices are detected, it will provide a link to download correct driver. When correct drivers are installed, Driver Magician can back them up and save them in a compressed file or an auto-setup file for next-time usage.

Most hardware manufacturers recommend you download the latest official (non beta) drivers on a regular basis to keep your computer running correctly. Driver Magician has a built in database of the latest drivers, therefore it greatly simplifies the process of driver update and improve hardware performance obviously.

Driver Magician is the right choice for unknown devices detection, device driver backup, restoration and update. It is both affordable to every computer user and a real value.

System Requirements
Driver Magician will run under Windows 98, Me, 2000, XP, 2003 and Vista on an Intel-based 586 PC or greater. The program requires 32 MB of RAM and 5 MB disk space to install.

Price and Availability
Driver Magician is available now. The price for single user license is $29.95 USD. A trial version is available from the GoldSolution Software web site at:
http://www.drivermagician.com

Twitter Delicious Facebook Digg Stumbleupon Favorites More