Showing posts with label Corrupt. Show all posts

23.8.11

ESET Microsoft security update (KB2286198) hangs or causes a BSOD on restart

If you are experiencing a system hang or blue screen error after attempting to install Microsoft security update (KB2286198), you will need to update your ESET security product. This issue is due to a potential conflict with the Windows update and ESET NOD32 Antivirus and ESET Smart Security. Downloading a new ESET virus signature update (version 5338 and later) will resolve this issue. To update your ESET security product, follow the steps below:

Open the main program window by clicking the ESET icon next to the system clock or by clicking Start All Programs ESET ESET Smart Security or ESET NOD32 Antivirus.

Click Update from the main menu on the left and click Update virus signature database in the main program window on the right.

The Update status should read: Version of virus signature database: 5338 (20100803). Verify that you have version 5338 or later.

Restart the Windows update process. Visit Microsoft's Windows 7 Solution Center for more information on receiving Windows updates.

Tabs And Windows Firefox Home

Why weren't my tabs and windows restored?

If you had tabs and windows open when you closed Firefox, the new default Firefox home page will have a Restore Previous Session button on it. To get your tabs and windows back, just click it. Restore Previous Session - Win1
If you don't use the default Firefox home page, you can restore your tabs and windows from the History menu:

At the top of the Firefox window, click the Firefox button, go over to History (History menu in Windows XP) and select Restore Previous Session. Restore Previous Session - Win2

For more info about how session restore works, see Session Restore and Firefox does not ask to save tabs and windows on exit.
Why are the menus (File, Edit, View, etc.) missing?

If you're using Windows 7 or Windows Vista, you now have an orange Firefox button that takes the most common functions and puts them in one menu.

To temporarily show the old style menus, just press the Alt key.
To have them shown all the time, right-click on an empty section of the Tab Strip and check Menu Bar in the pop-up menu.
Menu Bar - Win

How do I get the orange Firefox button?

If you're using Windows XP or you've customized your toolbars, you can switch to using the orange Firefox button by:

Right-clicking on an empty section of the Tab Strip and unchecking Menu Bar in the pop-up menu.

See Menu bar is missing for problems with the Menu bar and check out How do I customize the toolbars? for more about arranging Firefox to fit your needs.
What happened to the back, refresh and home buttons?

To streamline the navigation section and group buttons by task, a few things have changed:

The back button drop-down menu can be accessed by clicking and holding on the back button.
The stop and refresh buttons are combined into one button on the right end of the location bar.
The home button is to the right of the location bar.

Nav Buttons - Win
Not crazy about this arrangement? No problem. It's your browser, make Firefox work the way you do. See How do I customize the toolbars? for more about customizing buttons and toolbars.

Right-click on an empty section of the Tab Strip, select Customize... and the Customize Toolbar window will open.
Drag, drop and rearrange items.
To add an item to a toolbar, drag it from the Customize Toolbar window onto the toolbar where you want it to appear.
To remove an item from a toolbar, drag it to the Customize Toolbar window.
To move an item in a toolbar, drag it where you want it to appear.
When you are finished making changes, click Done to close the Customize Toolbar window.

Custom Buttons - Win
What happened to the Status Bar?

The Status Bar at the bottom of the Firefox window has changed. The new Status Bar only shows page loading activity and link previews. When neither of those are needed it simply disappears. Please see What happened to the Status Bar? for more.
Status Bar link - win
Status Bar load - win
Why do my fonts look blurry?

If you are using Windows Vista or Windows 7, text in Firefox may appear blurry. This is usually due to Windows ClearType not being turned on.

In Windows, click Small Vista Logo and type cleartype in the search box.
Click Adjust ClearType text to open the ClearType control panel.
Check Turn on ClearType and then Next to fine tune your settings.
After you fine tune the ClearType settings, click Finish to accept them.

For more details see, Fonts look blurry. It's also possible that you are also experiencing issues related to outdated graphics card drivers. See How do I upgrade my graphics drivers? for more information, including how to disable hardware acceleration in Firefox as a possible workaround.
Some of my add-ons were disabled. What can I do?

After upgrading, Firefox checks for new versions of your add-ons and disables those that are no longer compatible. By default it will continue to check for new versions periodically. For more info, see Add-ons are disabled after updating Firefox.

Some add-ons (like Firebug) have completely different versions for new versions of Firefox so the auto-update feature won't work. To check for a new version:

At the top of the Firefox window, click on the Firefox button (Tools menu in Windows XP), and then click Add-ons. The Add-ons Manager tab will open.
In the Add-ons Manager tab, select the Extensions panel.
Click the more link in the add-on's description.
In the detail view, click the homepage link to be taken to the add-on's website where you can search for a newer version.

Where are my bookmarks?

Relax. If you were using the Bookmarks Toolbar to hold your favorite sites you may just have to turn it back on:

Right-click on an empty section of the Tab Strip and check Bookmarks Toolbar in the pop-up menu.
Bookmarks Toolbar - Win

You can also view and organize your bookmarks in the Library window.

Click the Bookmarks button Bookmarks button win 2 on the right side of the navigation toolbar (Windows XP: click the Bookmarks menu) and select Show All Bookmarks to open the Library window.

Bookmarks Button win

For more about using bookmarks, including tagging and organizing, see How do I use bookmarks?
Why are tabs on top of the location bar now?

The main reason is that it just makes more sense — especially with features like App Tabs and the Add-ons Manager. For details on this change, see Why are tabs on top?
How do I put tabs back like they used to be?

Right-click on an empty section of the Tab Strip and uncheck Tabs on Top in the pop-up menu.

6.8.11

Preparing To Configure Windows. Please Do Not Turn Off Your Computer

I just bought a Toshiba Laptop for a Client with windows 7 home,

As a favour for my clients I usually run windows update for them so they get it all working and are 100% confident that when they get it as up to date as possible,

I ran into the exact same problem as above, i read this thread and read all different reply's but none of them realy worked for me and i didnt have time to wait...

this is what worked for me:

1. Hold down the power button and switch of your machine
2. Restart your computer and just before windows boots hit the F8 button
3. Boot into safe mode
4. login (if nessecary)
5. Make sure that any virus scanners at this point are disabled before continuing
6. Click "Start" > "Accessories" > "System Restore"
7. Click "Next"
8. Pick an earlier restore point and then click next, (its best to pick the 1 just before you had problems)
9. Click next and follow the prompts and it will start a system restore
10. wait till your computer does this System Restore process
11. Regardless of whether the system restore process fails or passes it should now get you out being stuck at "Preparing To Configure Windows. Please Do Not Turn Off Your Computer."

Now...

12. login if required
13 Disable Virus Scanner before moving on
14. Run windows update
15. now it should run without any problems

16. if you do have problems and run into a loop Call your Computer Manufacturer or the company that you purchased it off and see if they can help you,

Error 646 while installing updates

Issue Summary:

We are aware of a potential issue you may encounter with recent Office Security updates. When installing these updates, the Windows Update control panel returns the error 646 or 0x80070646.


Technical Details:

The error 0x80070646 or 646 is an MSI installer error that will only occur when the updates are installed via the Windows Update control Panel. Previous workaround to resolve the immediate problem requires the installation of the update from a standalone package from the Microsoft Download Center. We do not recommend this workaround.


If Windows Installer logging is enabled, the following line should be noted as a symptom:


Error 1606. Could not access network location %APPDATA%\


Cause:

The problem is potentially a result of an inconsistent/incorrect environmental variable (%AppData%) as shown below:


Solution:

1. Open the Registry editor. To do so, Click Start, type regedit in the Start Search box, and then click regedit.exe in the Programs list.In the User Account Control dialog box, click Continue.


2. Navigate to the following registry keysHKEY_USERS\.DEFAULT\Software\Microsoft\Windows\CurrentVersion\Explorer\User Shell Folders


3. The correct and default value forAppData should be %USERPROFILE%\AppData\Roaming. To change the value, double click on Appdata, then change the string in the value data field.


4. Close the Registry editor, and try again Windows Update again. (A reboot shouldnot be required.)


5. If the problem persists, repeat the steps 2 through 4 with the following registry keys:

· HKEY_CURRENT_USER\Software\Microsoft\Windows\CurrentVersion\Explorer\User Shell Folders\

· HKEY_LOCAL_MACHINE\Software\Microsoft\Windows\CurrentVersion\Explorer\User Shell Folders\

Troubleshoot problems installing Windows 7 Service Pack 1

When installing a service pack for Windows 7 or Windows Server 2008 R2 you might get an "Installation was not successful" error message. The most common causes of this problem are:

An inconsistency in the Windows Servicing Store. The Windows Servicing Store is a feature that is required to successfully install the service packs.

A program on your computer, such as an antivirus or antispyware program, is interfering with the installation of the service pack.

To solve this problem, try to install the service pack again

Windows 7 fails to configure updates

As a first step of troubleshooting, I would suggest you to check the updates history to see if there are any updates that have a failed status and let me know the description of those updates.

Step 1: Check the update history

http://windows.microsoft.com/en-US/windows7/See-which-Windows-updates-are-installed

Let me know if the description of the updates that have failed status.


Step 2: Manually try installing the updates from Microsoft Download Center

a. Go to the Microsoft download website, type the "KB" number of the update into the download search box, and then click Go.

b. In the list of search results, click the Knowledge Base (KB) article link to go to the download page. If there's more than one listing, look for a link that goes to the Microsoft Download Center.

Windows 7 fails to configure updatesc. If there are multiple versions on the download page, find the appropriate one for your computer. Click the Download button, and save the update to your desktop.

d. When prompted, click Open to install the update.


Step 3: Run Windows Update Troubleshooter

http://windows.microsoft.com/en-US/windows7/Open-the-Windows-Update-troubleshooter


Step 4: The update is not installed successfully, you receive a message, and the computer restarts when you try to install an update in Windows Vista and Windows 7

http://support.microsoft.com/kb/949358

No sound after update Windows : Sound Aufzeichnen Spielen

windows update u. sound stellt sich ab. Soundcard Zoom r 16
Ich lösche das Windowsupdate, also uhr zurückgehen, dann funktioniert die Soundcard wieder
- english. Windows update, than noch sound anymore . soundcard zoom r16
When I delete the windows update, than i can hear again. Help

Which updates were installed?

Run the Microsoft fix it “Diagnose and repair sound playback problems automatically “: http://support.microsoft.com/mats/no_sound

Also here is some online help on the topic: http://windows.microsoft.com/en-us/windows7/Tips-for-fixing-common-sound-problems

Error code 66A while trying to install update KB2446708

Net 4 update problems
I am trying to install the .net 4 update (KB2446708) for Vista, it gives me error code 66A. I have tried to Repair the .net Framework Client Profile and it comes back with Not Suceeded because of a GenericTrust Failure.I have tried to reset the Windows Update Components using the fix it tool. What shall I try next??
Error code 66A while trying to install update KB2446708
see if this helps fix it:

How do I reset Windows Update components?

there is an automatic "fix-it" there too

http://support.microsoft.com/kb/971058

Also, try putting the KB numbers in the search at the below link then manually download them

http://www.microsoft.com/downloads/en/default.aspx

Can't install KB2160841 Error Code: 66a

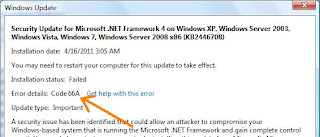
Getting error code 66A Windows update encountered an unknown error. Security Update for .NET Framework 4 on Windows XP, Windows Server 2003, Windows Vista, Windows 7, Windows Server 2008, Windows Server 2008 R2 for x64-based Systems (KB2160841)

Can't install KB2160841 Error Code: 66a
Installation date: ‎10/‎17/‎2010 2:14 PM

Installation status: Failed

Error details: Code 66A

Update type: Important

A security issue has been identified that could allow an attacker to compromise your Windows-based system that is running the Microsoft .NET Framework and gain complete control over it. You can help protect your computer by installing this update from Microsoft. After you install this item, you may have to restart your computer.

1.8.11

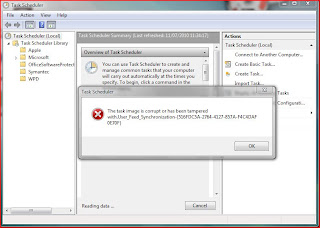
The task image is corrupt or has been tampered

In order to fix this, you have to delete the actual task XML file that contains the task settings,
then rerun the Task Scheduler to confirm that the error is gone, then import a non-corrupted version of the task back into the Task Scheduler.
Most of the work you have to do is to locate the task file in question.
The task files are located in C:\Windows\System32\Tasks.
If you try to open the task folder, you might get a UAC prompt asking you for permission to access the folder, this is OK, just click continue to access the folder.
In my case, the corrupt task was "Microsoft-Windows-DiskDiagnosticDataCollector".
The task image is corrupt or has been tamperedThis was a Microsoft task, therefore I had to go into the C:\Windows\System32\Tasks\Microsoft\Windows\DiskDiagnostic folder to locate the actual task xml file,
which was named "Microsoft-Windows-DiskDiagnosticDataCollector".

Once you have located the task file, close the task scheduler, back up the corrupted task file to any location of your choice, then delete it, then open the task scheduler to confirm that the error has gone.

What you now need to do is to export the non-corrupted task from another computer or virtual machine, and import it into the task scheduler.
To export the task in question from another computer, follow these steps.

1. Open the Task Scheduler, then drill down into the task in question, then right-click on the task and select "Export...".
2. Save the exported XML file to a location of your choosing, then copy it over to the affected computer.
3. Once you are back on the affected computer, make sure that the task scheduler is closed, then you need to run the task scheduler as an Administrator.
4. To run the task scheduler as an Administrator, click Start>All Programs>Accessories>System Tools, then locate "Task Scheduler", right-click it and select "Run as Administrator".
5. Once the task scheduler is open, drill down to the folder where the task is supposed to be located, right-click on a blank portion of the window, and select "Import Task...".
6. Once you have imported the task, a "Create task" window will open as shown below, just click OK to it.
7. The task should then be successfully imported, you can then close the task scheduler, and the problem should be fully resolved.

Stub has stopped working Error message

Can you do the following for me please?
OTL
Download OTL to your desktop.
Double click on the icon to run it. Make sure all other windows are closed to let it run uninterrupted.
When the window appears, underneath Output at the top change it to Minimal Output.
Under the Standard Registry box change it to All.
Check the boxes beside LOP Check and Purity Check.
Click the Run Scan button. Do not change any settings unless otherwise told to do so. The scan wont take long.
When the scan completes, it will open two notepad windows. OTL.Txt and Extras.Txt. These are saved in the same location as OTL.
Please copy (Edit->Select All, Edit->Copy) the contents of these files, one at a time, and post it with your next reply.

CKScanner

Please download CKScanner from here to your Desktop.

Make sure that CKScanner.exe is on the your Desktop before running the application!

Double-click on CKScanner.exe and click Search For Files.
After a very short time, when the cursor hourglass disappears, click Save List To File.
A message box will verify the file saved
CKFiles.txt will be created on your desktop, copy and paste the contents of this into your next post

Malwarebytes Anti-Malware

Download and install MBAM from here
Run a full scan

Black screen F8 key unresponsive Can't reboot

The drive is easy to put in.
1 - remove the AC Adapter and battery
2 - open up the case over the hard drive (usually 1 or 2 screws)
3 - lift up on the plastic tab to remove the hard drive
4 - remove the adapter over the SATA/IDE connector (it pulls off)
5 - unscrew 4 screws to remove the drive from the "caddy"
6 - reassemble in reverse.
Since the old drive is bad, you'll definitely need a set of recovery disks. If you don't have them now, you'll have to order them from the link I gave earlier (If in the USA). They usually arrive in a couple of days and it'll take a couple of hours to install.

Turn the computer on, open the CD/DVD drive and put Disk 1 in. Close the drive
Restart the system, tapping Esc as soon as the Compaq splash screen shows up.
Select the CD/DVD drive to boot from - and follow the prompts.

Here's a link to the product manual. Chapter 4 deals with replacing the hard drive: http://h10032.www1.hp.com/ctg/Manual/c01523646.pdf

C00D1199 Error message Problem

Error Message C00D1199
So I made a big mistake.
C00D1199 Error message Problem

I got a Flip Video Camera for my birthday. Woot. I could watch the videos with no problem. So I got motivated. I was trying to use the mpeg videos it produces in WMM. I downloaded a codec package, and now I can't watch the originals. I unistalled the darn package, and no change.

The error message I'm getting is C00D1199. From what I can find it's a broad error code for a variety of problems. Can anyone help me?

Ok, there are several way which you could try. The first of which, is installing codecs:

Free-Codecs.com : Download K-Lite Codec Pack 6.1.0 FULL, K-Lite Codec Pack 6.1.0 STANDARD, K-Lite Codec Pack 6.1.0 BASIC : K-Lite Codec Pack is a collection of codecs and related tools

If you download and install this (I would use the full version). Then you should be able to import .mp4 files into WMM and merge them together.

17.6.11

Windows Update Error code "0x80070646," "646," or "1606"

This article (KB2258121) provides a fix for a problem in which you receive error code 0x80070646, error code 646, or error code 1606. This update issue occurs when you install Office updates by using Windows Update or Microsoft Update. For detailed information, see the “Symptoms,” “Cause,” and “Resolution” sections of this article.

To download the fix for this update problem, click the View and request hotfix downloads link that is located on the upper-left of the screen.

When you try to install updates for Microsoft Office applications through Windows Update or through Microsoft Update, you may receive one of the following error codes.

Error code 1
0x80070646

Error code 2
646

Error code 3
“Error 1606 Could not access network location %APPDATA%”

This update problem occurs when Windows Installer encounters an error. Error code 0x80070646 and error code 646 are generated by Windows Installer. These generic errors indicate that Windows Installer encountered a problem. When you encounter the errors that are described in the "Symptoms" section, the problem may be caused by an incorrect value in the registry.

11.6.11

Find and FIx Windows DLL errors in Windows 7, Vista and XP

Find and fix DLL errors in Windows 7, Vista and XP

When you encounter a Dynamic-Link Library error (DLL error) or related Windows 7, XP or Windows Vista error, what can you do about it? How can you track down the source of the problem and, one hopes, fix the problem?

With a little bit of Windows troubleshooting skills one can usually find the problem and fix it. If a Windows error of this type is troubling you, it can be fixed in most cases with some effort.
What the heck is a DLL, anyway?

A DLL is often a part of an application or software program, containing some of the application's instructions or additional data required by the application. It is also used to share components between applications–it's a way to create modular components that can be replaced or updated without having to update the entire application. DLL files are a key component of the Windows operating system, and have been so since the earliest versions.

Here are some suggestions on how to fix DLL problems:

First, copy down any error message(s) you see. You can also take a screen snapshot using the 'Prt Sc' key (stands for 'Print Screen') which will copy the screen's contents into the clipboard so that you can then paste it into a Word document or the MSPAINT application, so you can then print the error message for future reference.

Second, search the web for the error message using your favorite search engine. Look for results that are a close match for the problem you are experiencing. The closer the match, the better.

Now, if you can find good results on the web, you may be in luck: if others have resolved the issue, you should be able to find some suggestions for solving the problem. In my experience it is very rare for someone to encounter a problem that no one else has discussed. So, if you can't find useful info using a web search, it may be a matter of refining your search to narrow down the results.

Usually, the problem comes down to re-installing or updating the software package that is encountering the problem. Sometimes, there is a patch available from Microsoft if the problem is caused by part of Windows.

Occasionally, the problem is caused by one application installer overwriting a shared copy of a DLL, and another application was dependent on a particular (older or newer) version of the DLL. (This has been described as "DLL Hell" by some - when one application damages another by replacing shared components - a poorly-written windows installer can certainly contribute to this problem.) In this case, it may be possible to place the correct copy of the dependent DLL in the affected applicatio'n's program directory - DLLs are loaded first from the current directory, which is usually the location of the applications main .exe file.

In other cases, you might want to consider spyware or adware removal - AdAware or Spybot S&D (or similar product) may be helpful in this case. I've not seen adware or spyware cause DLL version errors, but it is possible that one or more of these nuisances may cause such a problem. In any case, you should check your machine for malware - viruses (using an online scanner if needed), or the aforementioned spyware/adware, if found, should be removed, if for no other reason than to eliminate it as the possible cause of any problem.

8.5.11

What is User Account Control?

Every single time you delete a file, Windows asks you “Are you sure you want to move this file to the Recycle Bin?” This is typically a good thing, to prevent you from deleting files by accident, but if you are trying to do some cleanup and need to delete a lot of files, you might not want to be prompted every single time.

There’s a simple way to turn it off.

Right-click on your Recycle Bin
Choose Properties from the menu.

Now you’ll see the Trash Properties dialog, and notice the “Display delete confirmation dialog” at the bottom.

Uncheck the box.
Press Apply, and hit OK

Thats it, although it is recommended to have it turned on.

Install a Bluetooth device

To install a Bluetooth device, you only have to connect it. Microsoft Windows XP Service Pack 2 (SP2) includes drivers for many Bluetooth devices. If Windows does not recognize a Bluetooth device, you can still use it by using the generic software support that Windows includes, or you can use the driver that the device manufacturer provides. To add a Bluetooth device to your computer, you can use the Add Bluetooth Device Wizard. To configure a Bluetooth connection, you use the Bluetooth Devices item in Control Panel.

You can join an ad hoc network between Bluetooth devices by using Personal Area Networking (PAN). When you use PAN, your computer and other Bluetooth devices use TCP/IP networking to communicate. If you have a Bluetooth device that supports dial-up networking, you can use it as a modem. You can use the Add Printer Wizard to use a Bluetooth printer wirelessly. Finally, you can transfer files between Bluetooth-ready computers or devices by using Bluetooth. This article includes step-by-step procedures for these tasks.

Connectivity problems in Windows XP Service Pack 2

Basic troubleshooting
This section of the article contains basic troubleshooting methods to resolve Bluetooth issues that may occur after you install Windows XP Service Pack 2.

The troubleshooting steps in this section are appropriate for beginning to intermediate users. If the troubleshooting steps in this section do not resolve your issue, you may want to try the steps in the "Advanced troubleshooting" section later in this article.

This section of the article discusses the following topics:

Steps to try first
Steps to try if your Bluetooth device is not detected when you add the device

Steps to try first
Try the following basic troubleshooting steps first. They may quickly resolve your issue.

If your Bluetooth device uses batteries, make sure that your batteries are charged.
If your Bluetooth device uses a transceiver that connects to your computer through a USB port, try connecting the transceiver to another USB port on your computer.
If there are multiple Bluetooth devices connected to your computer, temporarily remove the devices that you are not troubleshooting. If there are additional USB devices, try removing any USB devices that you do not have to have installed during the troubleshooting process. If you have multiple devices that are connected by using USB, this can interfere with a Bluetooth transceiver.
Verify that the Bluetooth device that you are troubleshooting is powered on and that it is enabled.

Steps to try if your Bluetooth device is not detected when you add the device
Method 1: Make sure that Windows XP Service Pack 2 is installed
Verify that you have Windows XP SP2 installed. To do this, follow these steps:

Click Start, and then click Run.
In the Open box, type winver.exe, and then click OK.
In the About Windows dialog box, verify that Windows XP SP2 is installed.

About Windows dialog box

If Windows XP Service Pack 2 is listed, try Method 2. If If Windows XP Service Pack 2 is not listed, install the service pack again. To install Windows XP Service Pack 2, follow these steps:
In Internet Explorer, visit the following Microsoft Web site:
http://update.microsoft.com/
If any important updates are available for your computer, install them. To do this, click Install updates. If you are prompted to restart your computer after all the updates are installed, restart your computer.

Important You might have to restart your computer after you install certain updates. When you restart your computer, the content that you are now viewing will no longer be displayed. So, before you continue, you might find it helpful to create a shortcut to this Web page on your desktop so that you can easily return to this page by double-clicking the shortcut. To create a shortcut to this Web page on your desktop, follow these steps:

Right-click this page, and then click Create Shortcut.
In the Internet Explorer dialog box, click Yes to create a shortcut on your desktop.

Method 2: Make sure that your Bluetooth device is discoverable and that your computer is set to enable Bluetooth devices to connect to your computer

Right-click the Bluetooth icon in the notification area, and then click Open Bluetooth Settings.

Bluetooth icon

Note If the Bluetooth icon is not in the notification area, click Start, click Run, type bthprops.cpl, and then click OK. To use the bthprops.cpl command, make sure that Windows XP SP2 supports your Bluetooth adapter and the Bluetooth adapter has been successfully installed on your Windows XP SP2-based computer. For more information about how to install the Bluetooth adapter and Bluetooth devices in Windows XP Service Pack 2, click the following article number to view the article in the Microsoft Knowledge Base:
883259 How to install and configure Bluetooth devices in Windows XP Service Pack 2
On the Options tab, click to select the Turn discovery on check box, and then click Apply.

Bluetooth Devices dialog box

To enable Bluetooth devices to connect to your computer, click to select the Allow Bluetooth devices to connect to this computer check box, and then click OK.

Bluetooth Devices dialog box

Advanced troubleshooting steps
This section is intended for advanced computer users. If you are not comfortable with advanced troubleshooting, you might want to ask someone for help or contact support. For information about how to do this, visit the following Microsoft Web site:
http://support.microsoft.com/contactus/

6.5.11

Kaspersky Rescue Disk 01.05.2011

Kaspersky Rescue Disk 10 is a free and safe program to remove viruses from a computer without the risk of getting infected! Kaspersky Rescue Disk is designed to scan and disinfect x86 and x64-compatible computers that have been infected. The application should be used when the infection is so severe that it is impossible to disinfect the computer using anti-virus applications or malware removal utilities (such as Kaspersky Virus Removal Tool) running under the operating system. In this case, disinfection is more efficient because malware programs do not gain control when the operating system is being loaded. In the emergency repair mode, you can only start objects scan tasks, update databases roll back updates and view statistics. Boot from the Kaspersky Rescue Disk to scan and remove threats from an infected PC without the risk of infecting other files or computers. Burn this ISO image to a CD, insert it into the infected system's CD-ROM drive, enter the PC's BIOS, set it to boot from the CD and reboot the PC.

DuckLoad
http://takemyfile.com/1225802
-=-=-=-=-=--=-=-=-=-=--=-=-=-=-=-
FileKeen
http://takemyfile.com/1225803
-=-=-=-=-=--=-=-=-=-=--=-=-=-=-=-
Kaspersky Rescue Disk
FileSonic
http://takemyfile.com/1225857
-=-=-=-=-=--=-=-=-=-=--=-=-=-=-=-
Turbobit
http://takemyfile.com/1225804
-=-=-=-=-=--=-=-=-=-=--=-=-=-=-=-
UpLoaded.To
http://takemyfile.com/1225805
-=-=-=-=-=--=-=-=-=-=--=-=-=-=-=-
JumboFiles
http://takemyfile.com/1225858
-=-=-=-=-=--=-=-=-=-=--=-=-=-=-=-
RapidShare
http://takemyfile.com/1225806
-=-=-=-=-=--=-=-=-=-=--=-=-=-=-=-
Zshare
http://takemyfile.com/1225859
-=-=-=-=-=--=-=-=-=-=--=-=-=-=-=-
MegaUpload
http://takemyfile.com/1225860
-=-=-=-=-=--=-=-=-=-=--=-=-=-=-=-
IFile.It
http://takemyfile.com/1225807

5.5.11

Phone to Windows 7 Bluetooth File Transfer

Bluetooth devices are very common nowadays. By using this technology it is so easy to share files between very different devices. If your computer or laptop has a Bluetooth dongle or built-in module, Windows 7 can use it for exchanging files with other Bluetooth enabled devices such as mobile phones, iPods, iPhones, PSP devices, etc. In this guide I will show you how to verify that your dongle or built-in module works, how to connect your computer to another Bluetooth enabled device and how to exchange files between them.
Verify that Bluetooth is Working Correctly
The first thing you should do before starting a Bluetooth connection is to make sure that the Bluetooth dongle or integrated module is inserted in the computer and turned on.
Windows 7 will then install the drivers needed for the Bluetooth device. It has drivers for most Bluetooth dongles and built-in devices but, if it's not able to find any suitable drivers for it, then you should install those which are bundled by the manufacturer of your product via an install disc or on its official website.
Next, you will see a Bluetooth icon in the system tray or notification area which means that Bluetooth is active.
Bluetooth
If it is not active, you'll have to enable Bluetooth on your computer. By default, the wireless and Bluetooth connections are active. If, for some reason, they're not, look for a button on the surface of your laptop that should enable both wireless and Bluetooth connections. If you can't find that button please read the laptop's manual to find it and learn how to turn on Bluetooth.
Now, you need to make sure that the Bluetooth works properly. Type in the Start menu search box the word bluetooth and click on the 'View devices and printers' search result. Another way is to go to 'Control Panel -> Hardware and Sound -> Devices and Printers'.
Bluetooth
In the new window you will see a list with all devices and printers that are connected to your computer. The Bluetooth dongle or integrated module will be on that list as well. If your Bluetooth device has a yellow exclamation point on its icon it means that there is a problem with it. Otherwise it means that the device is working properly.
Bluetooth
If the device has problems, select it and then click on the Troubleshoot button from the top menu. Follow the wizard's instructions and hopefully, Windows will find a solution to the problem.
Bluetooth
NOTE: If the device that you want to connect via Bluetooth to your computer has specific software applications made exactly for this kind of task, I recommend you to use that software. For example, if you have a phone with Bluetooth support it is a good idea to use that phone's "PC Suite" application on your computer.
Connect a Device to Your Computer Using Bluetooth
First you need to make sure that your computer can be seen by the Bluetooth device. In other words, you need to make sure the computer is discoverable via Bluetooth. You can access the Bluetooth settings on your computer by right-clicking the Bluetooth icon in the system tray or notification area, and selecting 'Open Settings'.
Bluetooth
Or you can simply search in the Start Menu's search box for bluetooth and click on the 'Change Bluetooth settings' search result.
Bluetooth
The Bluetooth settings window will now open. In the Options tab, at the Discovery section, check 'Allow Bluetooth devices to find this computer'. This will allow other devices to see your computer. When done, click on OK.
NOTE: Enable this option only if you want the Bluetooth device to find and connect to your computer. The other way around, connecting from the computer to the device, works without having this option enabled.
Bluetooth
Next, you have to activate Bluetooth on your device. Search for discoverable devices, select the computer and pair with it. Then you have to enter a password for this connection. On your computer you will see a system notification about a device that wants to connect with it. Click on that balloon or, if you missed it, double click on the Bluetooth icon from the system tray or notification area.
Bluetooth
In the new 'Add a device' window you have to type the same password as you did in in the device that is connecting to the computer. Then click on Next.
Bluetooth
Now Windows 7 will search for drivers and it will install them for the device that is connecting to your computer. To verify that the device has been properly installed click the Devices and Printers link from the 'Add a device' window.
Bluetooth
There you can also see if the device is working properly or if it requires troubleshooting.
NOTE: If Windows doesn't find suitable drivers for the Bluetooth Peripheral Device, don't worry, you will still be able to send and receive files.
Bluetooth
Now, assuming that there are no problems, let's see how to send a file from the device to the computer through Bluetooth.
Connect the Computer to a Device Using Bluetooth
Turn on the Bluetooth function on the device and make it discoverable so that your computer will find it. Then open up the Bluetooth device window either by double-clicking the Bluetooth icon from the system tray or notification area. Click on the 'Add device' button or simply search in the Start Menu's search box for bluetooth and select the 'Add a Bluetooth device' result.
Bluetooth
Next Windows 7 will search for Bluetooth enabled devices. When it finds your Bluetooth device, select it and click on Next.
Bluetooth
Then Windows 7 will show you a password or PIN that you have to type in the device. After you typed the PIN in your device, click on Next.
Bluetooth
Now you can see the newly added device in the Bluetooth Devices window. There you can also see if the device is working properly or if it requires troubleshooting.
How to Send a File via Bluetooth
In order to send a file either right-click the Bluetooth icon from the system tray/notification area and select the 'Send a file' option or search for bluetooth in the Start Menu's search box and click on 'Bluetooth File Transfer'. Then select the 'Send a file' action.
Bluetooth
Now select the device to which you want to send a file from the computer and click on Next. In the next window, click on Browse to select the file that you want to send and then click on Next.
Bluetooth
Tip: Hold down the Shift or Ctrl key to select multiple files.
You might need to allow the transfer on your device as well, and only then the computer will connect with it and it will send the file. In the next window you will see a summary of the files that were delivered to the device through the Bluetooth connection. Click on Finish to exit the window.
Bluetooth
If you want to send other files, repeat the same steps as above.
How to Receive a File via Bluetooth
In order to receive a file from the device to your computer, you can either right-click the Bluetooth icon from the system tray or notification area and select 'Receive a file' or search for bluetooth in the Start Menu's search box and click on 'Bluetooth File Transfer'. Then select the 'Receive a File' option.
Bluetooth
Windows 7 will wait until you select a file on your device. Select the file to be sent to the computer through the Bluetooth connection, wait until the device finds the computer, select it, and then your computer will receive the file. In the next window you will see the name and the size of the file and you have to possibility to choose where to save it. Click on Browse to choose a different location than the default one and then click on Finish.
Bluetooth
The file is now received and stored in the location you selected.
Conclusion
As you can see, sending or receiving files through a Bluetooth connection is quite easy, even if some problems can happen. The lucky part is that the troubleshooting wizards are definitely better at offering solutions then those from Windows Vista and, when using them, you will get some good solutions to your problems.
The wide range of devices that have support for Bluetooth can be a disadvantage because Microsoft can't collect and deliver driver support for every product that has Bluetooth capabilities. That's why every topic about Bluetooth connections between devices and computers is full of people complaining about problems with the connection, drivers or anything in between.
The best way to eliminate some of the problems is to switch from your old phone to a newer one with more modern capabilities and driver support.
If you have problems, solutions or you know some great tips and tricks about Bluetooth connections don't hesitate to share them with us in a comment.

Twitter Delicious Facebook Digg Stumbleupon Favorites More