Showing posts with label Connections. Show all posts

23.8.11

Firefox clear the cache

The Firefox cache temporarily stores images, scripts, and other parts of websites while you are browsing. This article describes how to clear the Firefox cache.

To clear your history (i.e. cookies, browsing history, cache, etc.) all at once
As you browse the web, Firefox helpfully remembers lots of information for you – sites you've visited, files you've downloaded and more. All of this information is called your history. However, if you are using a public computer or share a computer with someone, you may not want others to be able to see these kinds of things.

This article explains what information is stored in your history and gives you step-by-step ways to clear all of part of it. To temporarily have Firefox not store any history

Firefox Private Browsing

As you browse the web, Firefox helpfully remembers lots of information for you – sites you've visited, files you've downloaded and more. However, there may be times when you don't want other users of your computer to see this information. For example, if you share a computer with someone and have been shopping for their birthday present.

Private Browsing allows you to browse the Internet without saving any information about which sites and pages you’ve visited. This article explains what information is not saved when in Private Browsing and gives you step-by-step instructions for using it.
Warning: Private Browsing doesn't make you anonymous on the Internet. Your internet service provider, employer, or the sites themselves can still track the pages you visit. Also, Private Browsing doesn't protect you from keyloggers or spyware that may be installed on your computer.

Tabs And Windows Firefox Home

Why weren't my tabs and windows restored?

If you had tabs and windows open when you closed Firefox, the new default Firefox home page will have a Restore Previous Session button on it. To get your tabs and windows back, just click it. Restore Previous Session - Win1
If you don't use the default Firefox home page, you can restore your tabs and windows from the History menu:

At the top of the Firefox window, click the Firefox button, go over to History (History menu in Windows XP) and select Restore Previous Session. Restore Previous Session - Win2

For more info about how session restore works, see Session Restore and Firefox does not ask to save tabs and windows on exit.
Why are the menus (File, Edit, View, etc.) missing?

If you're using Windows 7 or Windows Vista, you now have an orange Firefox button that takes the most common functions and puts them in one menu.

To temporarily show the old style menus, just press the Alt key.
To have them shown all the time, right-click on an empty section of the Tab Strip and check Menu Bar in the pop-up menu.
Menu Bar - Win

How do I get the orange Firefox button?

If you're using Windows XP or you've customized your toolbars, you can switch to using the orange Firefox button by:

Right-clicking on an empty section of the Tab Strip and unchecking Menu Bar in the pop-up menu.

See Menu bar is missing for problems with the Menu bar and check out How do I customize the toolbars? for more about arranging Firefox to fit your needs.
What happened to the back, refresh and home buttons?

To streamline the navigation section and group buttons by task, a few things have changed:

The back button drop-down menu can be accessed by clicking and holding on the back button.
The stop and refresh buttons are combined into one button on the right end of the location bar.
The home button is to the right of the location bar.

Nav Buttons - Win
Not crazy about this arrangement? No problem. It's your browser, make Firefox work the way you do. See How do I customize the toolbars? for more about customizing buttons and toolbars.

Right-click on an empty section of the Tab Strip, select Customize... and the Customize Toolbar window will open.
Drag, drop and rearrange items.
To add an item to a toolbar, drag it from the Customize Toolbar window onto the toolbar where you want it to appear.
To remove an item from a toolbar, drag it to the Customize Toolbar window.
To move an item in a toolbar, drag it where you want it to appear.
When you are finished making changes, click Done to close the Customize Toolbar window.

Custom Buttons - Win
What happened to the Status Bar?

The Status Bar at the bottom of the Firefox window has changed. The new Status Bar only shows page loading activity and link previews. When neither of those are needed it simply disappears. Please see What happened to the Status Bar? for more.
Status Bar link - win
Status Bar load - win
Why do my fonts look blurry?

If you are using Windows Vista or Windows 7, text in Firefox may appear blurry. This is usually due to Windows ClearType not being turned on.

In Windows, click Small Vista Logo and type cleartype in the search box.
Click Adjust ClearType text to open the ClearType control panel.
Check Turn on ClearType and then Next to fine tune your settings.
After you fine tune the ClearType settings, click Finish to accept them.

For more details see, Fonts look blurry. It's also possible that you are also experiencing issues related to outdated graphics card drivers. See How do I upgrade my graphics drivers? for more information, including how to disable hardware acceleration in Firefox as a possible workaround.
Some of my add-ons were disabled. What can I do?

After upgrading, Firefox checks for new versions of your add-ons and disables those that are no longer compatible. By default it will continue to check for new versions periodically. For more info, see Add-ons are disabled after updating Firefox.

Some add-ons (like Firebug) have completely different versions for new versions of Firefox so the auto-update feature won't work. To check for a new version:

At the top of the Firefox window, click on the Firefox button (Tools menu in Windows XP), and then click Add-ons. The Add-ons Manager tab will open.
In the Add-ons Manager tab, select the Extensions panel.
Click the more link in the add-on's description.
In the detail view, click the homepage link to be taken to the add-on's website where you can search for a newer version.

Where are my bookmarks?

Relax. If you were using the Bookmarks Toolbar to hold your favorite sites you may just have to turn it back on:

Right-click on an empty section of the Tab Strip and check Bookmarks Toolbar in the pop-up menu.
Bookmarks Toolbar - Win

You can also view and organize your bookmarks in the Library window.

Click the Bookmarks button Bookmarks button win 2 on the right side of the navigation toolbar (Windows XP: click the Bookmarks menu) and select Show All Bookmarks to open the Library window.

Bookmarks Button win

For more about using bookmarks, including tagging and organizing, see How do I use bookmarks?
Why are tabs on top of the location bar now?

The main reason is that it just makes more sense — especially with features like App Tabs and the Add-ons Manager. For details on this change, see Why are tabs on top?
How do I put tabs back like they used to be?

Right-click on an empty section of the Tab Strip and uncheck Tabs on Top in the pop-up menu.

9.7.11

Internet Explorer 9 Now Available in 93 Languages

Internet Explorer 9 is now available in more local languages than any other browser on Windows. Today, we released support for IE9 in 53 additional languages, making IE9 available in a total of 93 languages:
Please visit the Worldwide downloads page to download IE9 in a language of your choice. Here’s the complete list of languages Internet Explorer 9 is available in, starting with the originally released 40 and followed by the 53 new languages in blue:
A browser in the language of the user’s choice is an important part of delivering the best experience of the Web on Windows. With IE9, our goal was to deliver more languages faster. With today’s release, IE9 is available in all languages that Windows Vista is available in and in 93 of 96 languages Windows 7 is available in.
Installing Internet Explorer 9 in a language of your choice

You can install localized versions of IE9 in a language that matches your version of Windows or choose to install the English version of IE9, which works with all versions of Windows Vista and Windows 7.

Users on multi-lingual versions of Windows or users who have already installed IE9 English or one of the previously supported languages can install a language pack to experience IE9 in one of the new languages released today. Please visit the Microsoft Download Center pages below to download IE9 language packs.

Internet Explorer 9 Language Packs for Windows 7 and Windows Server 2008 R2
Internet Explorer 9 Language Packs for Windows Vista and Windows Server 2008

IE9 through Windows Update for the 53 new languages released today

We will start offering IE9 to customers in one of the 53 new languages starting next week via the Automatic Update feature of Windows Update. As described earlier, we will offer IE9 via a gradual rollout and expect the rollout to be largely complete by the end of June.

IE9 language packs will also be available as an optional update via Windows Update to help users who have IE9 installed and one or more Windows Language Interface pack in the 53 new languages available today.
More Languages, Faster: From IE8 to IE9

With IE9, our goal was to deliver more languages faster. More specifically, our goals included the simultaneous release of final IE9 in more languages than IE8, and a shorter interval between the final release of IE9 and the remaining languages.
Customizing IE9 using IEAK9

With this release, IEAK9 now supports building custom IE9 packages in all 93 languages. IEAK9 is a tool used to simplify the creation, deployment and management of customized IE9 packages. You can download IEAK9 from http://ieak.microsoft.com. Please see the TechNet site for information on using IEAK9 to build custom IE9 packages.

Thank you for using IE9 in a language of your choice, and we hope you will enjoy this release as much as we do!

Vishwac Sena Kannan and Kevin Luu, Program Managers, Internet Explorer

8.7.11

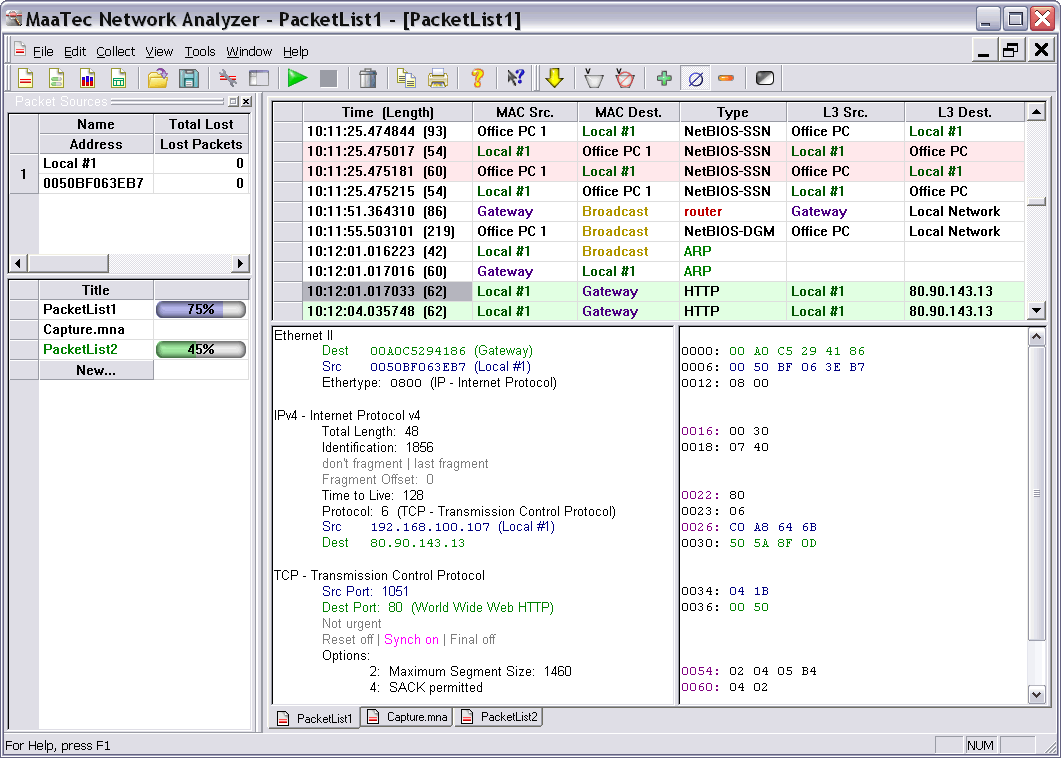
Network Analyzer Traffic on a LAN or a DSL internet connection

The MaaTec Network Analyzer is a tool that allows to capture, save, and analyze network traffic on a LAN or a DSL internet connection. You can use it for network troubleshooting, to analyze an existing network infrastructure, or for long-term network monitoring. The Network Analyzer combines following major components in one application:
-Protocol Analyzer (or 'packet sniffer') with real-time display
-Real-Time Statistics (displayed in tables with sortable columns)
-Scheduled Collection of protocol data into one or more files (Pro Version)
-Network Load over Time Statistics (per system, protocol, connection, etc.) (Pro Version)
-Network Report Generator (Pro Version)

Click on the pictures to open full size screenshots or a demo network report that was created with the application's report generator.

Network Analyzer Feature Highlights

Click here for a version history
New: The VLAN ID filter and VLAN statistics allow an even better analysis of virtual local area networks.
Support for Windows® Vista operating systems including 64-bit versions.
Scheduled Collector in the Pro version that allows manual or scheduled direct to disk packet capturing.
Support for files that are larger than 2 GB.
Network load over time statistics with history and configurable chart types, display for example the top 9 traffic causers (systems, protocols, etc.) during a configurable period of time in a clear stacked bar chart.
Punycode support in the DNS decoder, address database update via DHCP, new connection statistics, new optional 'Easy Statistics Mode' that displays only commonly used statistics modules with better understandable names.
Network Reports in HTML or XHTML format.
Reports with charts and multiple data tables.
Report generation can be controlled with command-line options and can be started in the background with the Windows® Task Scheduler.
Real-time network traffic statistics (25 different statistics modules available).
Scheduled network traffic reports.
Award-winning help system RoboHelp Award
Online view of incoming packets (Analyze, decode, and filter network packets while data collection is running).
IPv4 names are resolved by analyzing the incoming name service packets (without additional network traffic).
Multiple data color options (for data source, address names, protocol names, and background color)
Easy to use filter dialog.
Supports multiple network cards in one or multiple windows.
High performance due to assembler optimization and genuine new filter design.
Open multiple views with different filters and online packet display without performance degradation.
Capture full-speed 100 MBit/s even with older systems without losing data.
Unique new packet information display in splitted window.
Dump packet information with different detail levels.
Boot-free and Setup-free installation possible (just copy and start).
Customizable columns and display of relative time and lower layer protocols in the packet list view.
Advanced ISO OSI decoders.

System Requirements
32-bit Windows® 98 / ME / NT 4 / 2000 / XP / 2003 / Vista / 2008 / Windows 7,
64-bit Windows® XP / 2003 / Vista / 2008 / Windows 7,
486-compatible processor,
400 MHz processor for 100 MBit LANs recommended,
32 MB of free RAM when the OS is running,
MS HTML Help and IE 4 needed to use the help file.
Decoded Network Protocols

IPv4, IPv6, TCP, UDP, IPX, PPP, PPPoE, PPTP, ICMP, ICMPv6, IGMP, LCP, CHAP, CCP, CBCP, ARP, RIP, IPX-RIP, DNS, DHCP, GRE, bootpc, bootps, NetBIOS, NetBIOS-NS, LLMNR, SMB/CIFS, Microsoft-DS, NMPI, LLC, ITU-T X.233 CLNP, X.224 OSI TP, ISO 9542 ES-IS, ISO 10589 IS-IS, Telnet, TFTP, Teredo.

And as text-decode: HTTP, FTP, POP2, POP3, IMAP, IMAP3, MSNP, NNTP, SMTP, SSDP, WS-Discovery, ICSLAP.
Download : maatec.com

11.6.11

Common DLL Errors and Fixes in Windows Vista

DLL or Dynamic Link Library files are used by Windows operating systems and applications installed on them to store functions and codes that can be called on whenever required. There are hundreds of DLL files on a Windows system and several conditions that may result in DLL errors. Some of the common causes of DLL errors are:

Missing, corrupt, or damaged DLL.
Overwriting or deletion of one or more DLLs during program install or uninstall.
Faulty or corrupt applications.
Malware infections.
Erroneous or invalid entries in the registry.

To understand DLL errors better, let’s have a look at some common DLL errors and the methods you can use to fix them. Here are some most common:

Msvcr71.dll Error
Msvcp71.dll Error
Shell32.dll Error
Msoe.dll Error
Simple Tips to Prevent and Fix DLL Errors

8.5.11

Install a Bluetooth device

To install a Bluetooth device, you only have to connect it. Microsoft Windows XP Service Pack 2 (SP2) includes drivers for many Bluetooth devices. If Windows does not recognize a Bluetooth device, you can still use it by using the generic software support that Windows includes, or you can use the driver that the device manufacturer provides. To add a Bluetooth device to your computer, you can use the Add Bluetooth Device Wizard. To configure a Bluetooth connection, you use the Bluetooth Devices item in Control Panel.

You can join an ad hoc network between Bluetooth devices by using Personal Area Networking (PAN). When you use PAN, your computer and other Bluetooth devices use TCP/IP networking to communicate. If you have a Bluetooth device that supports dial-up networking, you can use it as a modem. You can use the Add Printer Wizard to use a Bluetooth printer wirelessly. Finally, you can transfer files between Bluetooth-ready computers or devices by using Bluetooth. This article includes step-by-step procedures for these tasks.

Connectivity problems in Windows XP Service Pack 2

Basic troubleshooting
This section of the article contains basic troubleshooting methods to resolve Bluetooth issues that may occur after you install Windows XP Service Pack 2.

The troubleshooting steps in this section are appropriate for beginning to intermediate users. If the troubleshooting steps in this section do not resolve your issue, you may want to try the steps in the "Advanced troubleshooting" section later in this article.

This section of the article discusses the following topics:

Steps to try first
Steps to try if your Bluetooth device is not detected when you add the device

Steps to try first
Try the following basic troubleshooting steps first. They may quickly resolve your issue.

If your Bluetooth device uses batteries, make sure that your batteries are charged.
If your Bluetooth device uses a transceiver that connects to your computer through a USB port, try connecting the transceiver to another USB port on your computer.
If there are multiple Bluetooth devices connected to your computer, temporarily remove the devices that you are not troubleshooting. If there are additional USB devices, try removing any USB devices that you do not have to have installed during the troubleshooting process. If you have multiple devices that are connected by using USB, this can interfere with a Bluetooth transceiver.
Verify that the Bluetooth device that you are troubleshooting is powered on and that it is enabled.

Steps to try if your Bluetooth device is not detected when you add the device
Method 1: Make sure that Windows XP Service Pack 2 is installed
Verify that you have Windows XP SP2 installed. To do this, follow these steps:

Click Start, and then click Run.
In the Open box, type winver.exe, and then click OK.
In the About Windows dialog box, verify that Windows XP SP2 is installed.

About Windows dialog box

If Windows XP Service Pack 2 is listed, try Method 2. If If Windows XP Service Pack 2 is not listed, install the service pack again. To install Windows XP Service Pack 2, follow these steps:
In Internet Explorer, visit the following Microsoft Web site:
http://update.microsoft.com/
If any important updates are available for your computer, install them. To do this, click Install updates. If you are prompted to restart your computer after all the updates are installed, restart your computer.

Important You might have to restart your computer after you install certain updates. When you restart your computer, the content that you are now viewing will no longer be displayed. So, before you continue, you might find it helpful to create a shortcut to this Web page on your desktop so that you can easily return to this page by double-clicking the shortcut. To create a shortcut to this Web page on your desktop, follow these steps:

Right-click this page, and then click Create Shortcut.
In the Internet Explorer dialog box, click Yes to create a shortcut on your desktop.

Method 2: Make sure that your Bluetooth device is discoverable and that your computer is set to enable Bluetooth devices to connect to your computer

Right-click the Bluetooth icon in the notification area, and then click Open Bluetooth Settings.

Bluetooth icon

Note If the Bluetooth icon is not in the notification area, click Start, click Run, type bthprops.cpl, and then click OK. To use the bthprops.cpl command, make sure that Windows XP SP2 supports your Bluetooth adapter and the Bluetooth adapter has been successfully installed on your Windows XP SP2-based computer. For more information about how to install the Bluetooth adapter and Bluetooth devices in Windows XP Service Pack 2, click the following article number to view the article in the Microsoft Knowledge Base:
883259 How to install and configure Bluetooth devices in Windows XP Service Pack 2
On the Options tab, click to select the Turn discovery on check box, and then click Apply.

Bluetooth Devices dialog box

To enable Bluetooth devices to connect to your computer, click to select the Allow Bluetooth devices to connect to this computer check box, and then click OK.

Bluetooth Devices dialog box

Advanced troubleshooting steps
This section is intended for advanced computer users. If you are not comfortable with advanced troubleshooting, you might want to ask someone for help or contact support. For information about how to do this, visit the following Microsoft Web site:
http://support.microsoft.com/contactus/

6.5.11

Windows 7 arrives : Windows Vista leaves

The waiting is over, and the upgrading can begin. Today, Microsoft's new Windows 7 operating system arrives in stores and on new computers. Microsoft is celebrating the occasion with characteristic hype, staging a gala event in New York to unveil the software.
Windows 7 arrives


For many PC users, Windows 7's arrival also means it's time to kick Windows Vista to the curb. (Yes, some people say they like Vista; I myself prefer Vista to XP, though that may only reflect how tired I am of the 8-year-old XP.) As I wrote in my column and on this blog last week, I think Windows 7 represents a clear upgrade over its predecessor.

But it's too soon to declare every Windows 7 feature a positive (or negative) development. The responses of users, software developers and hardware manufacturers to this operating system will shape those verdicts. For example, will multiple-Win 7-PC households become common enough that its HomeGroup networking option wins wide use? Will new applications adapt to 7's Libraries folders or will they continue to assume, incorrectly, that all of a user's files belong in one huge My Documents folder? Will gadget developers take advantage of 7's Device Stage interface for managing peripherals? Will computer vendors build affordable machines that take advantage of 7's enhanced support for touch screens?

We'll just have to see about all that.

In the meantime, if you are thinking about upgrading to 7, first run Microsoft's free Upgrade Advisor to make sure that your current system's hardware and software will still work under 7. The Lifehacker blog has more tips about preparing for a Win 7 install, including advice on setting it up alongside an earlier copy of Windows or on a Mac. Ars Technica outlines your purchase and upgrade options, including a couple of ways to get 7 at a discount.

To repeat my own advice about the two most common Win 7 upgrade scenarios: Going from XP to 7 will be be a painful experience requiring either some acquaintance with the workings of Windows or a friend with that knowledge; moving from Vista to 7 should be far easier, but it wouldn't hurt to wait for a couple of weeks to give your computer's manufacturer time to crank out any necessary bug fixes to its software bundle.

If, however, you were waiting to buy a new Windows computer, go ahead. You've been waiting long enough.
Are you reading this post on a computer running Windows 7? Tell me how the new version is working out for you -- post a report on your upgrade experience in the comments.

5.5.11

Phone to Windows 7 Bluetooth File Transfer

Bluetooth devices are very common nowadays. By using this technology it is so easy to share files between very different devices. If your computer or laptop has a Bluetooth dongle or built-in module, Windows 7 can use it for exchanging files with other Bluetooth enabled devices such as mobile phones, iPods, iPhones, PSP devices, etc. In this guide I will show you how to verify that your dongle or built-in module works, how to connect your computer to another Bluetooth enabled device and how to exchange files between them.
Verify that Bluetooth is Working Correctly
The first thing you should do before starting a Bluetooth connection is to make sure that the Bluetooth dongle or integrated module is inserted in the computer and turned on.
Windows 7 will then install the drivers needed for the Bluetooth device. It has drivers for most Bluetooth dongles and built-in devices but, if it's not able to find any suitable drivers for it, then you should install those which are bundled by the manufacturer of your product via an install disc or on its official website.
Next, you will see a Bluetooth icon in the system tray or notification area which means that Bluetooth is active.
Bluetooth
If it is not active, you'll have to enable Bluetooth on your computer. By default, the wireless and Bluetooth connections are active. If, for some reason, they're not, look for a button on the surface of your laptop that should enable both wireless and Bluetooth connections. If you can't find that button please read the laptop's manual to find it and learn how to turn on Bluetooth.
Now, you need to make sure that the Bluetooth works properly. Type in the Start menu search box the word bluetooth and click on the 'View devices and printers' search result. Another way is to go to 'Control Panel -> Hardware and Sound -> Devices and Printers'.
Bluetooth
In the new window you will see a list with all devices and printers that are connected to your computer. The Bluetooth dongle or integrated module will be on that list as well. If your Bluetooth device has a yellow exclamation point on its icon it means that there is a problem with it. Otherwise it means that the device is working properly.
Bluetooth
If the device has problems, select it and then click on the Troubleshoot button from the top menu. Follow the wizard's instructions and hopefully, Windows will find a solution to the problem.
Bluetooth
NOTE: If the device that you want to connect via Bluetooth to your computer has specific software applications made exactly for this kind of task, I recommend you to use that software. For example, if you have a phone with Bluetooth support it is a good idea to use that phone's "PC Suite" application on your computer.
Connect a Device to Your Computer Using Bluetooth
First you need to make sure that your computer can be seen by the Bluetooth device. In other words, you need to make sure the computer is discoverable via Bluetooth. You can access the Bluetooth settings on your computer by right-clicking the Bluetooth icon in the system tray or notification area, and selecting 'Open Settings'.
Bluetooth
Or you can simply search in the Start Menu's search box for bluetooth and click on the 'Change Bluetooth settings' search result.
Bluetooth
The Bluetooth settings window will now open. In the Options tab, at the Discovery section, check 'Allow Bluetooth devices to find this computer'. This will allow other devices to see your computer. When done, click on OK.
NOTE: Enable this option only if you want the Bluetooth device to find and connect to your computer. The other way around, connecting from the computer to the device, works without having this option enabled.
Bluetooth
Next, you have to activate Bluetooth on your device. Search for discoverable devices, select the computer and pair with it. Then you have to enter a password for this connection. On your computer you will see a system notification about a device that wants to connect with it. Click on that balloon or, if you missed it, double click on the Bluetooth icon from the system tray or notification area.
Bluetooth
In the new 'Add a device' window you have to type the same password as you did in in the device that is connecting to the computer. Then click on Next.
Bluetooth
Now Windows 7 will search for drivers and it will install them for the device that is connecting to your computer. To verify that the device has been properly installed click the Devices and Printers link from the 'Add a device' window.
Bluetooth
There you can also see if the device is working properly or if it requires troubleshooting.
NOTE: If Windows doesn't find suitable drivers for the Bluetooth Peripheral Device, don't worry, you will still be able to send and receive files.
Bluetooth
Now, assuming that there are no problems, let's see how to send a file from the device to the computer through Bluetooth.
Connect the Computer to a Device Using Bluetooth
Turn on the Bluetooth function on the device and make it discoverable so that your computer will find it. Then open up the Bluetooth device window either by double-clicking the Bluetooth icon from the system tray or notification area. Click on the 'Add device' button or simply search in the Start Menu's search box for bluetooth and select the 'Add a Bluetooth device' result.
Bluetooth
Next Windows 7 will search for Bluetooth enabled devices. When it finds your Bluetooth device, select it and click on Next.
Bluetooth
Then Windows 7 will show you a password or PIN that you have to type in the device. After you typed the PIN in your device, click on Next.
Bluetooth
Now you can see the newly added device in the Bluetooth Devices window. There you can also see if the device is working properly or if it requires troubleshooting.
How to Send a File via Bluetooth
In order to send a file either right-click the Bluetooth icon from the system tray/notification area and select the 'Send a file' option or search for bluetooth in the Start Menu's search box and click on 'Bluetooth File Transfer'. Then select the 'Send a file' action.
Bluetooth
Now select the device to which you want to send a file from the computer and click on Next. In the next window, click on Browse to select the file that you want to send and then click on Next.
Bluetooth
Tip: Hold down the Shift or Ctrl key to select multiple files.
You might need to allow the transfer on your device as well, and only then the computer will connect with it and it will send the file. In the next window you will see a summary of the files that were delivered to the device through the Bluetooth connection. Click on Finish to exit the window.
Bluetooth
If you want to send other files, repeat the same steps as above.
How to Receive a File via Bluetooth
In order to receive a file from the device to your computer, you can either right-click the Bluetooth icon from the system tray or notification area and select 'Receive a file' or search for bluetooth in the Start Menu's search box and click on 'Bluetooth File Transfer'. Then select the 'Receive a File' option.
Bluetooth
Windows 7 will wait until you select a file on your device. Select the file to be sent to the computer through the Bluetooth connection, wait until the device finds the computer, select it, and then your computer will receive the file. In the next window you will see the name and the size of the file and you have to possibility to choose where to save it. Click on Browse to choose a different location than the default one and then click on Finish.
Bluetooth
The file is now received and stored in the location you selected.
Conclusion
As you can see, sending or receiving files through a Bluetooth connection is quite easy, even if some problems can happen. The lucky part is that the troubleshooting wizards are definitely better at offering solutions then those from Windows Vista and, when using them, you will get some good solutions to your problems.
The wide range of devices that have support for Bluetooth can be a disadvantage because Microsoft can't collect and deliver driver support for every product that has Bluetooth capabilities. That's why every topic about Bluetooth connections between devices and computers is full of people complaining about problems with the connection, drivers or anything in between.
The best way to eliminate some of the problems is to switch from your old phone to a newer one with more modern capabilities and driver support.
If you have problems, solutions or you know some great tips and tricks about Bluetooth connections don't hesitate to share them with us in a comment.

Twitter Delicious Facebook Digg Stumbleupon Favorites More